Jscrambler integration with GitLab CI
In this section, we guide you on how to integrate Jscrambler into your existing GitLab CI pipelines to automate your code protection process.
After protecting your application with Jscrambler, we recommend you do not modify the protected files as you may risk breaking its functionality. For this reason, typically, you should add Jscrambler as the last step during the build stage.
In this guide, we assume you already have some basic knowledge around GitLab CI, for more information please refer to GitLab CI/CD documentation.
Getting started with Jscrambler configuration
First, if you haven't yet experienced Jscrambler's dashboard, we suggest you follow our Getting Started guide which will walk you through all the functionalities that we make available for our users.
For a quick setup, take a look at the Jscrambler 101 - First Use blog post that covers Jscrambler basic usage.
Jscrambler configuration file
If you are familiar with Jscrambler, you just need to download Jscrambler's configuration file for the application you want to protect. If you don't know how to do this, please consult the previously provided documentation links.
A Jscrambler configuration file should look like this:
{
  "keys": {
    "accessKey": "***********************",
    "secretKey": "***********************"
  },
  "applicationId": "#################",
  "parameters": [
    {
        "status": 1,
        "name": "objectPropertiesSparsing"
    },
    {
        "status": 1,
        "name": "whitespaceRemoval"
    },
    {
        "status": 1,
        "name": "regexObfuscation"
    },
    {
        "status": 1,
        "options": {
            "features": [
                "opaqueSteps"
            ]
        },
        "name": "controlFlowFlattening"
    },
    {
        "status": 1,
        "name": "booleanToAnything"
    },
    {
      "status": 1,
      "name": "identifiersRenaming"
    }
  ],
  "areSubscribersOrdered": false,
    "languageSpecifications": {
      "es8": true,
      "es7": false,
      "es6": true,
      "es5": true
  },
  "applicationTypes": {
      "html5GameApp": false,
      "javascriptNativeApp": false,
      "hybridMobileApp": true,
      "serverApp": false,
      "desktopApp": false,
      "webBrowserApp": true
  },
  "useRecommendedOrder": true,
  "tolerateMinification": true,
  "useProfilingData": false
}
After downloading Jscrambler configuration file for the application you want to protect, you should perform the next steps:
- Rename the configuration file to
.jscramblerrc - Remove the access and secret keys from the file. To do so, remove the following part of your configuration file:
"keys": { "accessKey": "***********************", "secretKey": "***********************" }- Usually you will store this configuration file in your Git repository, so you should not have the keys hardcoded in the file for security reasons
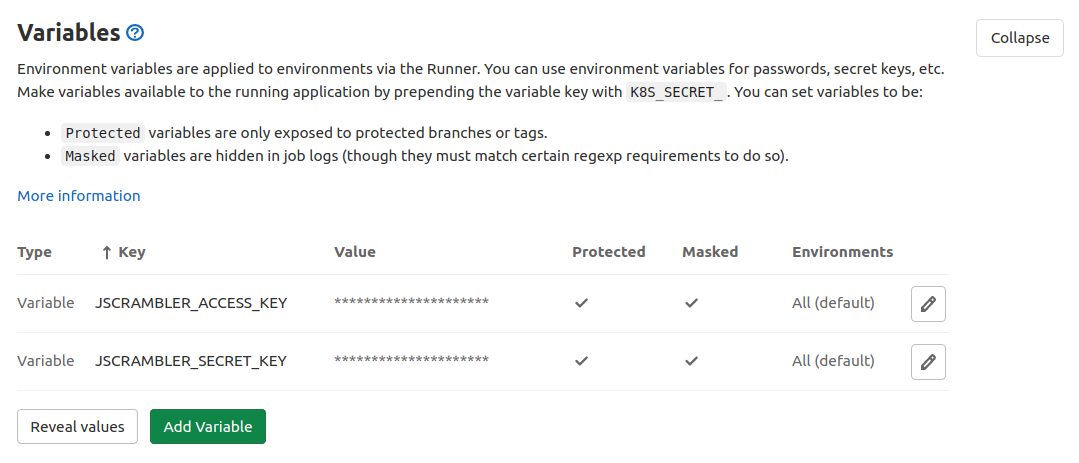
- We recommend you to store Jscrambler API keys using the GitLab CI/CD environment variables.
- Lastly, place the
.jscramblerrcfile on your application's root folder
You are all set! Let's move on to configuring a Jscrambler job with GitLab CI.
Configuring Jscrambler job with GitLab CI
Similarly to .jscramblerrc you should generate and place the .gitlab-ci.yml file at the base of your application's project.
This is just an example, you should adapt it according to your use case.
.gitlab-ci.yml
image: node:12-alpine

stages:
  - build
  - protect
  # - deploy
  # ...

# Your build job
build:production:
  stage: build
  artifacts:
    when: on_success
    paths:
      - build
  script:
    - npm i
    - npm run build

# Jscrambler JavaScript protection job
build:production:obfuscated:
  stage: protect
  before_script:
    - npm i -g jscrambler
  dependencies:
    - build:production
  artifacts:
    name: "$CI_JOB_NAME"
    when: on_success
    paths:
      - build
    expire_in: 1 week
  script:
    # By default, all artifacts from previous stages are passed to each job.
    - jscrambler -a $JSCRAMBLER_ACCESS_KEY -s $JSCRAMBLER_SECRET_KEY -o ./ build/**/*.*
Explanation
This configuration has two jobs:
build:production- runs the npm script
npm run build, which will build your app in production mode and output the result to a folder namedbuild/ - makes the
build/folder available as a GitLab CI artifact to be later used in other jobs
- runs the npm script
build:production:obfuscated- installs Jscrambler NPM Package
- executes Jscrambler which will protect the contents of the
build/folder- Jscrambler access and secret API keys are loaded as environment variables (check GitLab CI/CD environment variables)
- the protection output is placed into the same
build/folder, which is also made available as GitLab CI artifact to be later used in e.g. a deploy job.
This example covers the build and protect CI stages, next you would need to have a deploy job. The deploy job will be responsible for accessing the build/ folder, which contains the protected sources of your application and then performs the necessary procedures to make it live in a production environment.